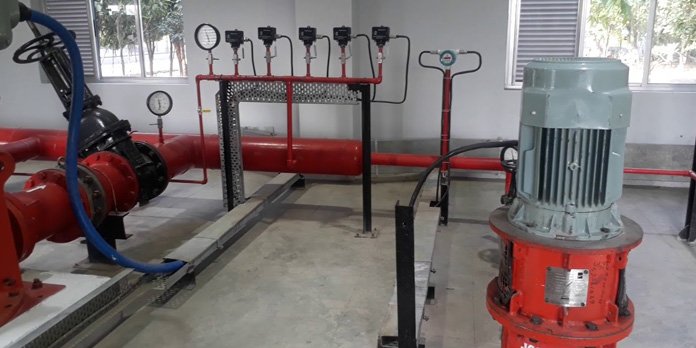
How Jockey pumps work


A jockey pump is a small device that works together with a fire pump as part of a fire-protection sprinkler system. Also referred to as a pressure-maintenance pump, it is designed to maintain high pressure when the system is not in use.

This is to keep the fire pump from running the entire time as well as ensuring the system stays in check.

It can also help prevent the system from damage when there is a fire and water rushes into the pipes. Jockey pumps consist of a three-part assembly.

Fire sprinkler systems consist of pipes with pressurized water in them and heads designed to open when they reach a certain temperature. When the particular temperature is reached and the heads open, the water pressure in the pipes drops to allow water to flow out. This action triggers the fire pump which will then begin to send more water through the pipes to enable the fire to be put out.

Also Read: Maintenance tips for slurry pumps

Now the jockey pump serves to keep the water pressure in the pipes within a specific range when there’s not a fire. This prevents the sprinklers from going off unnecessarily.  Moreover, since pipes are susceptible to leakage over time, the water pressure inside them tends to go down. As soon as the jockey pump senses this, it fills them back up to normal pressure.

On the other hand, should the pressure drop drastically during a fire such that the jockey pump is unable to keep up, the large fire pump will be triggered to send out water for putting out the fire.

The jockey pump also prevents sprinkler systems from being damaged once the fire pump starts sending water. Lack of a jockey pump in a system for purposes of pressure maintenance will result in relatively low pressure. As such, the sudden change in pressure applied when the fire pump starts sending water is likely to damage the system.

 

Maintenance tips for slurry pumps


A Slurry pump is a special type of pump able to handle slurry.  Unlike water pumps, slurry pumps are subject to wear. They are also more robust and heavy duty. As such, it is advisable to keep and follow through with maintenance as well as repairs for the slurry pump.

Seals-what most people are unaware of- whether packing or a mechanical seal, are one of the constituents that are usually replaced in a slurry pump. This is because abrasive particles can easily wear through packing or clog the mechanical seal components. This, in turn, tends to reduce the seal life down to weeks or even days in worst case scenarios.

As such, it is best to be aware of some of the best practices that speed up packing as well as seal replacement when necessary.

Also Read: Avoid catastrophic slurry pump cavitation

Lantern rings

For instance during packing, you should ensure you avoid the common lantern ring issues. This is caused by removing the lantern rings, which will result in their clogging. Once clogged, removal of the lantern rings becomes very hard.

On the other hand, most people tend to leave the lantern rings in place so as to avoid incurring such issues. This unfortunately leads to erosion and extrusion of the bottom rings. This, in turn, forces the lantern ring down to the stuffing box, misaligning it with the lantern ring port.

The general alteration will prevent the flush from going down the shaft and into the pump casing. As a result, solids are able to penetrate under the packing and this results in a shorter life of the same. One characteristic of a misaligned lantern ring is heavy flush water leakage on the OD of the packing.

Alternatively, you could avoid the aforementioned challenges by avoiding lantern rings altogether. This is because research has proven that the first three rings of packing do the majority of the sealing while the bottom rings help keep solids out.

With this knowledge, you can be able to use a throat bushing that has built-in flush ports. This not only eliminates the need to remove the lantern ring during repacking but it also ensures you use less packing.

Furthermore, since the top rings do most of the sealing, sealing capability will not be compromised. Moreover, specifically engineered bushings are available. These help to alter the flow of water within the stuffing box to remove solids.

Alternatively, a bushing is best for limiting the amount of particulate that can permeate the seal chamber. As such, there are engineered bushings designed to remove particulate from the seal chamber. They also help the seal operate in a clean.

Other methods that help prolong slurry pump life as well as reduce maintenance include the use of reinforced coatings, which are also known to reduce equipment costs. Furthermore, proper and automated lubrication extends bearing life. It is also important to note that for easier disassembly of the slurry pump, you should use high quality bolt and nut lubrication.

How to clean a pool pump strainer


A pool pump strainer is contained in a strainer basket in the pool pump housing assembly. Its purpose is to collect large pieces of debris that were missed by the skimmer or were sucked in though the main drains.

As such, the strainer is there to prevent the debris from entering the pump and clogging the impeller. However, the pool pump strainer should be checked and cleared weekly to prevent cases of clogging which in turn reduced the flow of water.

Before commencing the cleaning, make sure the pool pump is turned off. This will stop the flow of water through the pump. Once this is done, you should relieve the pressure that has built up in the pool pump and water line.

Most pumps have a pressure gauge which computes this, typically reading between 15 – 20 psi. To relieve the pressure, turn the air relief valve on top of the filter counter clockwise. Water will spray out initially. This is expected as the pressure on the gauge gradually reduces to 0 psi.

Also Read: When to repair or replace your pool pump

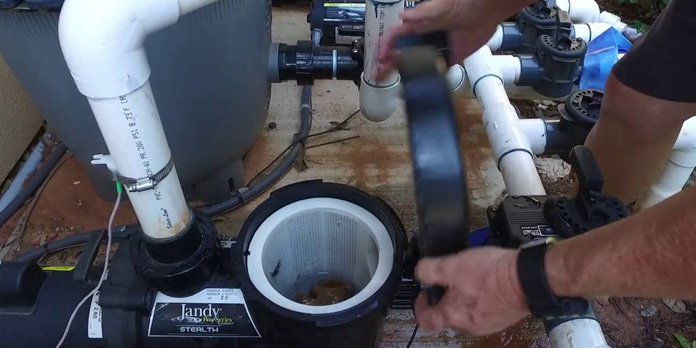
After relieving the pressure you can now open up the strainer. To do this, 1-turn the two knobs on top of the strainer lid counter-clockwise and 2– swivel the knobs down away from the lid. However, it is important to note that some pool pump strainer lids screw on instead of having knobs. These will require you to twist the lid counter-clockwise in order to remove the lid off the top of the strainer.

Check the basket for debris as soon as you manage to get the lid off of the pool pump strainer. You should also lift the basket out of the pool pump housing assembly in order to clean it properly. The debris at the bottom of the pool pump can be cleaned out with a garden hose. Point of caution; do not knock the basket either on the ground or hard surface as it is made of flexible plastic and as such could easily break.

As you drop the pool pump basket into the housing assembly, be sure to check for tears or stretching on the gasket. Before replacing the strainer lid, be sure to apply a thin coat of lubrication on the strainer gasket. This will help seat the gasket and will prolong its life.

After putting the lid back on and ensuring it’s tightly shut, turn on power to the pool pump to build up pressure in the system. While doing this, the air relief valve should still be open. This will facilitate an outlet for air as the pressure builds. Close the valve as soon as water starts to spray out of the valve.
